Welcome to The INKlings’ Team’s first ever blog hop. You may have arrived here from Rachel Jackson’s blog here or just be visiting my blog, whichever way, once you’ve checked out my cards and tutorial you can continue the hop through the link at the end of this post to the next team member.
What style of cards do we frequently get asked for inspiration for? More often than not it’s masculine cards, be it little boys or grandfathers everyone seems to struggle with cards for the males in our lives. So as a team we thought we’d help you out by providing you with 20 team members’ fantastic blogs that you can hop through and get lots of fantastic ideas from.
Want to win some Blog Candy? Simply leave a comment on each blog and then email Michelle Dyson here and let her know you’ve done so and you’ll be in the running for a fantastic prize of 20 handmade cards plus other goodies.
Sorry Blog Candy prize not available to SU! demonstrators.
I’ve created a punch art electric guitar! Here is the first one:
And if you’d like to create your own punch art electric guitar, here is a tutorial. You’ll need these punches: Large Star, 1 3/4″ circle, Curvy Label, 1 3/8″ circle, Oval and Horizontal Slot. Plus you’ll need one piece of cardstock 0.7cm x 9.5cm for the neck, 2 pieces of cord 25cm long (I’ve used retired SU silver cord) for the strings and 4 brads for the tuners and bridge.
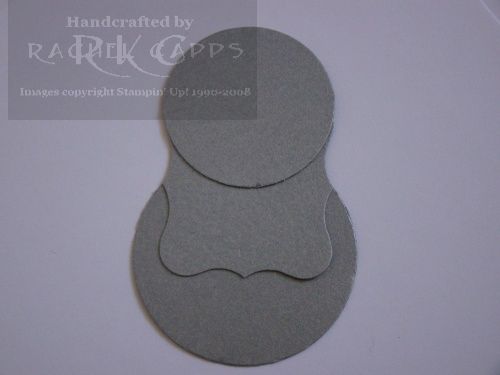
Punch out one each of the 1 3/4″ circle, Curvy Label and 1 3/8″ circle for the guitar’s body from cardstock of your choice. Stick them together like this:
You need to punch the Oval punch twice, like this:
Then punch out one Large Star in the same colour cardstock as your neck piece of cardstock. You will need to cut the star like this:
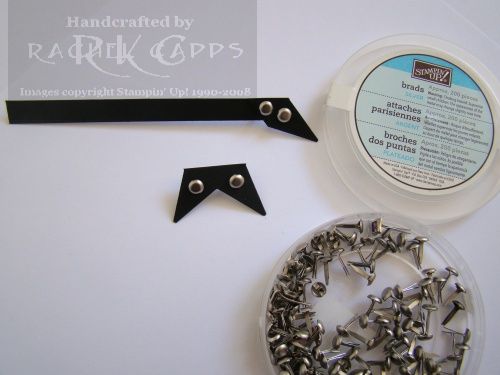
Then stick the cut piece of star to the neck cardstock, and insert your brads. Push your brads on through the bridge and the headstock of the guitar:
You can see from the above photo, I used the cut piece of my Large Star to make the bridge. You can make it with a punched out piece from the Horizontal Slot punch, if you choose.I found it easier to use the cut out piece from the Large Star – the paper is stronger once you pierce it and stick your brads on.
Then stick your neck to the guitar body:
Then stick your bridge on the body of the guitar:
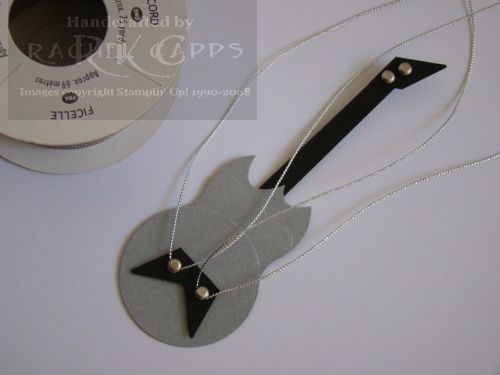
Then comes the fiddly bit! You need to wrap your cord around the brads on the bridge and tie the cord in a knot around the brads that are the tuners.
Then trim your cord. Next punch out three pieces of cardstock with your horizontal slot punch and glue them (I used 2-way glue) under your “strings” , like this:
And then stick your guitar to your card!
Here are a couple of other ideas:
Well that’s all from me. Next stop on the INKlings’ Team Blog Hop is Carolyn Campbell-McLean here. Have fun and don’t forget to leave a comment on each blog to win some great Blog Candy.
Thanks for looking 🙂
In case a link isn’t working, these are the fabulous participants in The INKlings first ever blog hop:
1. Clare http://craftycowcreations.blogspot.com/
2. Janice www.janicespencer.blogspot.com
3. Dani http://www.daniholland.wordpress.com/
4. Kylie http://kraftykylie.typepad.com/blossom_designs/
5. Amy http://amyandersonsblog.blogspot.com
6. Kari www.karigail.wordpress.com
7. Jayne http://www.jaynemercer.com/blogs
8. Joanna http://www.joannawassens.com
9. Michelle D http://stampinkpaper.blogspot.com
10. Christie http://christiescreativecorner.blogspot.com
11. Ryn http://rynscraps.blogspot.com
12. Fiona B. http://www.fionajanestamping.blogspot.com
13. Beth www.elisabethstewart.com
14. Nicky A http://nickyadamson.blogspot.com/
15. Dani F http://danifender.blogspot.com
16. Michelle FS http://stampinground.wordpress.com
14. Nicky A http://nickyadamson.blogspot.com/
15. Dani F http://danifender.blogspot.com
16. Michelle FS http://stampinground.wordpress.com
17. Rachel Jackson http://havefunstamping.blogspot.com/
18. Rachel Capps https://rachelcapps.wordpress.com/
19. Carolyn Campbell-McLean http://carolyncampbell-mclean.blogspot.com
20. Michelle Le Breton- http://www.michellescraftclasses.blogspot.com/
18. Rachel Capps https://rachelcapps.wordpress.com/
19. Carolyn Campbell-McLean http://carolyncampbell-mclean.blogspot.com
20. Michelle Le Breton- http://www.michellescraftclasses.blogspot.com/


WOW fantastic.
Rach:)
Very clever, can’t wait to have a go at making it.
WOW, I just LOVE the guitar…so effective. Very very clever!
cool guitar-way way WAY cool! i love it!
What a cool idea – you realise I’ll have to buy all those punches now don’t you. 😉
Awesome guitar Rachel! Will be CASEing it for a 30th birthday boy in June! Thanks for sharing the tutorial with us!!
These are AWESOME! Thanks for the tutorial too. Will be casing these too… So many great ideas!
Cool bananas!! Thanks for the inspiration:)
Just fantastic Rachel. LOVE IT!!!
Looks like my weekend will be spent punching!
LOL, you punch art girls are going to send me broke with all those punches I *neeeed* to own 😉 xx michelle
Amazing creation – thanks for sharing!
hi, love love love it, this cards is fantastic, i love punch art
WOW! This is AMAZING! We need to have a “Punch Off”!! 😉
Thanks for showing us how to make them Rach. I will have to make this one for my nephews birthday!
how cool is that guitar!! my son would LOVE IT!!
thanks for showing how to make it!!
Awesome!!!!!!! My daughter plays so I will definitely be making some of these. Thanks so much for sharing.
A definite wow – well done. Margaret
Almost have all the punches. I definitely will have to try your ideas. Thanks
What a great group of cards! I love the guitar!
Thanks soooo much for sharing your tutorial. I am in awe of the creativity I find. Thanks Ellen for giving me another blog to read!
Thanks for sharing! I’m off today and excited about the blog hop!
Very, very clever of you!! I would never have thought to make a guitar from our punches! It is extremely creative and so very good of you to share with us. The tutorial is excellent. I’m going to have to try this one!! TFS!
Great idea and beautiful cards. Thanks for the inspiration. I will share this with my two “stamping” granddaughters. Thanks for sharing with us.
Soooo clever. I love punch art and will definitely be ‘trying’ this idea. Keep them coming.
WOW – how clever are you?? My 9-yr-old son is looking over my shoulder, and he says “well, that’s interesting!!” Think we’ll be making some of these together – thanks for the inspiration!
awesome awesome awesome!!!! can’t wait to try this, I have a guitar made family so this will be so useful!!! great talent!!
Wow! I love punch art and this guitar is the best. Thanks for the tutorial. My grandson’s birthday is next month, he will be 4 years old and just loves guitars. I sure will be casing this one. Thanks for sharing your creativity!!
This is just so amazing. I cant wait to make one, I have all punches except the star punch, but I am sure I can still make it. Thank you for sharing your creativity.
WOW, that is a fabulous idea. I don’t know how you come up with these things.
Thanks for the great tutorial!
Can I just say that this is genius???!!! Love this guitar.
This was so inspirational to me that I decided to make a card using your creation…I mentioned your tutorial on my blog as well. Thank you so much for sharing.
Here’s the link to my card..I almost forgot
http://creativitywithstamps.typepad.com/my_weblog/2010/05/getting-ready-for-fathers-day.html
Love it. Thanks
Pingback: ‘Killer’ card! « Kari Hughes . . . . . . . . . . . . . . . . . . . . . . . . Independent Stampin' Up!® Demonstrator
OMG Rachel! Thanks for the PERFECT idea and the great tutorial! I just made one for my friend, and he will totally love it! Thanks again.