Archives

Best Yet punch gift tags

I totally forgot I’d made these!  These little gift tag bags were one of my free gifts at my Sale-a-bration launch earlier this year.

I took an SU cellophane bag and slid a piece of DSP – Bella Bleu – inside.  Then I punched the Word Window punch to make a slit at the top of the bag.  Then the little gift tags went inside and I tied a knot of Very Vanilla grosgrain ribbon at the top.

 I based the gift tags on the colours from Bella Bleu. I love Not Quite Navy, Kraft, Sahara Sand and Very Vanilla together!

 I love the way Stampin’ Up! punches layer together and look so good! I’ve used a variety of punches for these gift tags, but I made the Scallop Square punch my “unifying” punch on each gift tag.  For the above gift tag I also used the 1 3/4″ Circle and Designer Label punches.

For the above gift tag, I used also the 1 1/4″ Square and 1 3/8″ Square punches.  And, sadly, the stamp set Best Yet will only be available as a hostess set until the end of the month – and then it’s gone! 

And for this gift tag, I used the Curvy Label and Wide Oval punches. 

Thanks for looking 🙂

The INKlings’ Team’s first ever blog hop

 
Welcome to The INKlings’ Team’s first ever blog hop.  You may have arrived here from Rachel Jackson’s blog here or just be visiting my blog, whichever way, once you’ve checked out my cards and tutorial you can continue the hop through the link at the end of this post to the next team member. 
 
What style of cards do we frequently get asked for inspiration for? More often than not it’s masculine cards, be it little boys or grandfathers everyone seems to struggle with cards for the males in our lives.  So as a team we thought we’d help you out by providing you with 20 team members’ fantastic blogs that you can hop through and get lots of fantastic ideas from.    
 
Want to win some Blog Candy?  Simply leave a comment on each blog and then email Michelle Dyson here and let her know you’ve done so and you’ll be in the running for a fantastic prize of 20 handmade cards plus other goodies.

Sorry Blog Candy prize not available to SU! demonstrators.
 
I’ve created a punch art electric guitar!  Here is the first one:
 
 
And if you’d like to create your own punch art electric guitar, here is a tutorial.  You’ll need these punches: Large Star, 1 3/4″ circle, Curvy Label, 1 3/8″ circle, Oval and Horizontal Slot.  Plus you’ll need one piece of cardstock 0.7cm x 9.5cm for the neck, 2 pieces of cord 25cm long (I’ve used retired SU silver cord) for the strings and 4 brads for the tuners and bridge.
 
 
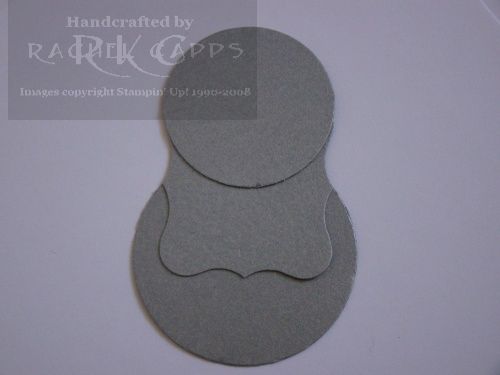
Punch out one each of the 1 3/4″ circle, Curvy Label and 1 3/8″ circle for the guitar’s body from cardstock of your choice.  Stick them together like this:


You need to punch the Oval punch twice, like this:


Then punch out one Large Star in the same colour cardstock as your neck piece of cardstock.  You will need to cut the star like this:


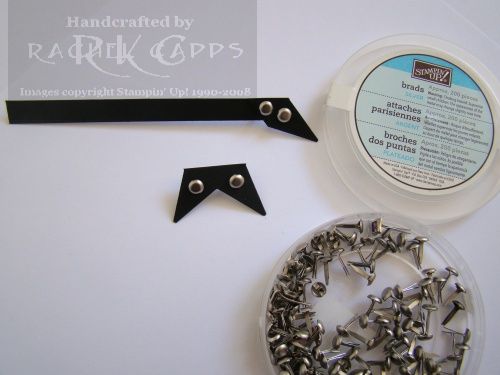
Then stick the cut piece of star to the neck cardstock, and insert your brads.  Push your brads on through the bridge and the headstock of the guitar:
 
 
You can see from the above photo, I used the cut piece of my Large Star to make the bridge.  You can make it with a punched out piece from the Horizontal Slot punch, if you choose.I found it easier to use the cut out piece from the Large Star – the paper is stronger once you pierce it and stick your brads on.
 
Then stick your neck to the guitar body:


Then stick your bridge on the body of the guitar:
 
 
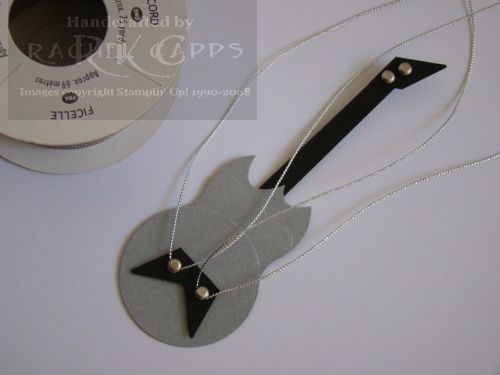
Then comes the fiddly bit!  You need to wrap your cord around the brads on the bridge and tie the cord in a knot around the brads that are the tuners. 
 
 
Then trim your cord.  Next punch out three pieces of cardstock with your horizontal slot punch and glue them (I used 2-way glue) under your “strings” , like this:


And then stick your guitar to your card!

Here are a couple of other ideas:

 
Well that’s all from me.  Next stop on the INKlings’ Team Blog Hop is Carolyn Campbell-McLean here.  Have fun and don’t forget to leave a comment on each blog to win some great Blog Candy.
 
Thanks for looking 🙂
 
In case a link isn’t working, these are the fabulous participants in The INKlings first ever blog hop:
 
 
1. Clare http://craftycowcreations.blogspot.com/                 
2. Janice  www.janicespencer.blogspot.com                
3. Dani http://www.daniholland.wordpress.com/                 
4. Kylie http://kraftykylie.typepad.com/blossom_designs/               
5. Amy      http://amyandersonsblog.blogspot.com      
6. Kari     www.karigail.wordpress.com        
7. Jayne      http://www.jaynemercer.com/blogs 
8.  Joanna   http://www.joannawassens.com  
9. Michelle D  http://stampinkpaper.blogspot.com  
10. Christie   http://christiescreativecorner.blogspot.com    
11. Ryn    http://rynscraps.blogspot.com  
12. Fiona B.  http://www.fionajanestamping.blogspot.com
13. Beth    www.elisabethstewart.com             
14.  Nicky A    http://nickyadamson.blogspot.com/
15. Dani F http://danifender.blogspot.com               
16. Michelle FS http://stampinground.wordpress.com

Batman belt punch art

This is a card I made for my son’s 4th birthday this week – a card from his Nona.  He loved it!

I was inspired by a card on Spiltcoaststampers here.

I made it using Stampin’ Up! punches – the wide oval, Star and Small Oval.  I used the stamp set On Your Birthday for the sentiment.  The colours are Ballet Blue, Summer Sun, Basic Black and Basic Grey.  And I used Basic Grey textured card stock, which I think gives the belt extra dimension.

Thanks for looking 🙂

Skater 16th birthday

This is another card I made for my God son’s birthday.  Skater boy!

I used by Wide Oval punch with a strip of DSP from the Simply Scrappin’ Kit Hoppy Memories for the skateboard.  I used diamond shaped brads (retired) for the skateboard trucks and Brilliant Blue buttons (retired) for the wheels. 

The colours are Brilliant Blue and Basic Grey.  The DSP is Kaleidoscope from the current Summer Mini catalogue.  The “look who’s turning” is from the stamp set On Your Birthday, and the “16” is from Best Friends Numbers (retired).

Thanks for looking 🙂

Punch art electric guitar

I was asked by a dear friend to make my God son’s birthday cards.  He’s 16 this year (and making me feel very old! lol!).  I sussed out his interests as we don’t see them as often as we would like – they live in Brisbane.  Anyway, skakeboards and music were the clues.  Only, I don’t have any stamps with music, guitars or skateboards!  So this is what I came up with for the music card – a punch art electric guitar.  I’m pretty happy with the way it turned out.

I’ve used only Stampin’ Up! punches to make the guitar.  I used the 1-3/4″ circle, Curvy Label, 1-3/8″ circle, Small Oval, Horizontal Slot, and Large Star.

And I got to stamp a little – the sentiment.  I used the Sale-a-bration stamp set, Vintage Labels.  My favourite!!  The paper is the Kaleidoscope DSP available in the current Stampin’ Up! mini. 

If you like my electric guitar, why not make your own and paste the link to your guitar in the comments section?  I’d love to see what you come up with!  If you’d like me to do a tutorial, let me know in the comments.

Thanks for looking 🙂